
MilVus Collection
Table Of Contents:
- What Is A MilVus Collection?
- How To Create A MilVus Collection?
- How To View MilVus Collection?
- How To Load & Release MilVus Collection?
- How To Create Aliases For MilVus Collection?
- How To Set Properties Of MilVus Collection?
- How To Drop A MilVus Collection?
(1) What Is A MilVus Collection?
- A MilVUS (Multimodal Information Retrieval and Natural Language Understanding System) collection refers to the dataset or corpus of documents, images, and other multimedia content that is used to train and evaluate the MilVUS system.

(2) How To Create A MilVus Collection?
- You can create a collection in either of the following manners:
Quick Setup
In this manner, you can create a collection by simply giving it a name and specifying the number of dimensions of the vector embeddings to be stored in this collection. For details, refer to Quick setup.
Customized Setup
Instead of letting In Milvus decide almost everything for your collection, you can determine the schema and index parameters of the collection on your own. For details, refer to Customized setup.
(3) Quick Setup
- Milvus allows a quick setup of such a collection with just three arguments:
Name of the collection to create,
Dimension of the vector embeddings to insert, and
Metric type used to measure similarities between vector embeddings.
- For quick setup, use the
create_collection()method of theMilvusClientclass to create a collection with the specified name and dimension.
from pymilvus import MilvusClient, DataType

### Step-1: Set up a Milvus client
client = MilvusClient(
    uri="http://localhost:19530"
)

### Step - 2. Create a collection in quick setup mode
client.create_collection(
    collection_name="quick_setup",
    dimension=5
)

# Get The Status Of The Collection
res = client.get_load_state(
    collection_name="quick_setup"
)


print(res)
- The collection generated in the above code contains only two fields:
id(as the primary key) andvector(as the vector field), - with
auto_idandenable_dynamic_fieldsettings enabled by default.
auto_idEnabling this setting ensures that the primary key increments automatically. There’s no need for manual provision of primary keys during data insertion.
enable_dynamic_fieldWhen enabled, all fields, excluding
idandvectorin the data to be inserted, are treated as dynamic fields. These additional fields are saved as key-value pairs within a special field named$meta. This feature allows the inclusion of extra fields during data insertion.- The automatically indexed and loaded collection from the provided code is ready for immediate data insertions.
(4) Customized Setup:
- Instead of letting Milvus decide almost everything for your collection, you can determine the schema and index parameters of the collection on your own.
Step – 1: Set Up Schema:
- A schema defines the structure of a collection.
- Within the schema, you have the option to enable or disable
enable_dynamic_field, add pre-defined fields, and set attributes for each field. - For a detailed explanation of the concept and available data types, refer to Schema Explained.
- To set up a schema, use
create_schema()to create a schema object andadd_field()to add fields to the schema.
# Create schema
schema = MilvusClient.create_schema(
    auto_id=False,
    enable_dynamic_field=True,
)

# Add Fields To Schema:
schema.add_field(field_name="my_id", datatype=DataType.INT64, is_primary=True)
schema.add_field(field_name="my_vector", datatype=DataType.FLOAT_VECTOR, dim=5)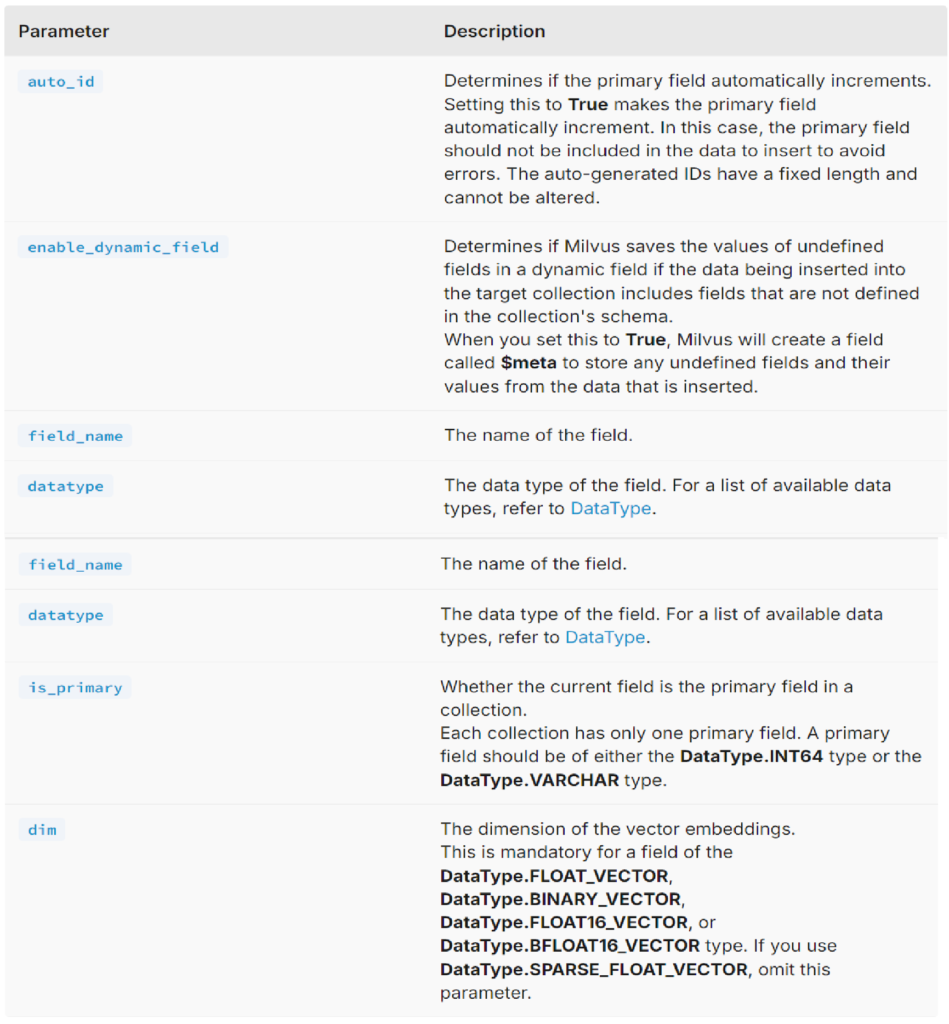
Step – 2: Set Up Index Parameter
- Index parameters dictate how Milvus organizes your data within a collection.
- You can tailor the indexing process for specific fields by adjusting their
metric_typeandindex_type. - For the vector field, you have the flexibility to select
COSINE,L2,IP,HAMMING, orJACCARDas themetric_type, depending on the type of vectors you are working with. - For more information, refer to Similarity Metrics.
- To set up index parameters, use
prepare_index_params()to prepare index parameters andadd_index()to add the index.
# Prepare Index Parameter
index_params = client.prepare_index_params()


index_params.add_index(
    field_name="my_id",
    index_type="STL_SORT"
)

index_params.add_index(
    field_name="my_vector",
    index_type="IVF_FLAT",
    metric_type="IP",
    params={ "nlist": 128 }
)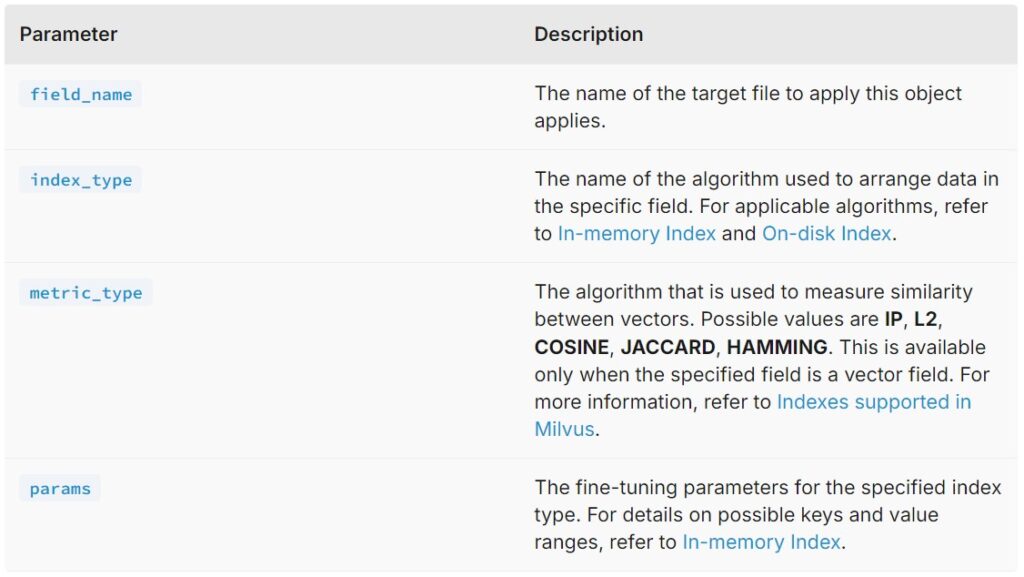
- The code snippet above demonstrates how to set up index parameters for the vector field and a scalar field, respectively. For the vector field, set both the metric type and the index type.
- For a scalar field, set only the index type. It is recommended to create an index for the vector field and any scalar fields that are frequently used for filtering.
Step – 3: Create The Collection
- You have the option to create a collection and an index file separately or to create a collection with the index loaded simultaneously upon creation.
Use create_collection() to create a collection with the specified schema and index parameters and get_load_state() to check the load state of the collection.
client.create_collection(
    collection_name="customized_setup_1",
    schema=schema,
    index_params=index_params
)

time.sleep(5)

res = client.get_load_state(
    collection_name="customized_setup_1"
)

print(res)
The collection created above is loaded automatically. To learn more about loading and releasing a collection, refer to Load & Release Collection.
Create The Collection & Index File Separately
# 3.6. Create a collection and index it separately
client.create_collection(
    collection_name="customized_setup_2",
    schema=schema,
)

res = client.get_load_state(
    collection_name="customized_setup_2"
)

print(res)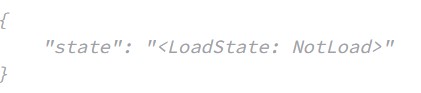
# 3.6. Create a collection and index it separately
client.create_collection(
    collection_name="customized_setup_2",
    schema=schema,
)

res = client.get_load_state(
    collection_name="customized_setup_2"
)

print(res)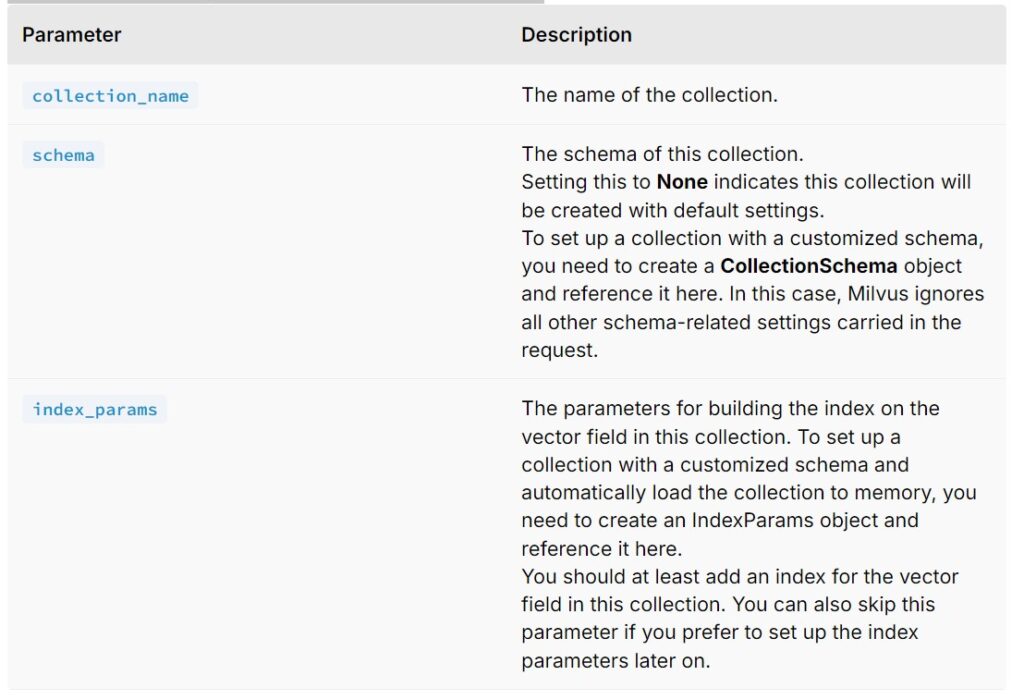
- The collection created above is not loaded automatically. You can create an index for the collection as follows.
- Creating an index for the collection in a separate manner does not automatically load the collection. For details, refer to Load & Release Collection.
# 3.6 Create index
client.create_index(
    collection_name="customized_setup_2",
    index_params=index_params
)

res = client.get_load_state(
    collection_name="customized_setup_2"
)

print(res)
(5) View Collections
- To check the details of an existing collection, use describe_collection().
# 5. View Collections
res = client.describe_collection(
    collection_name="customized_setup_2"
)

print(res)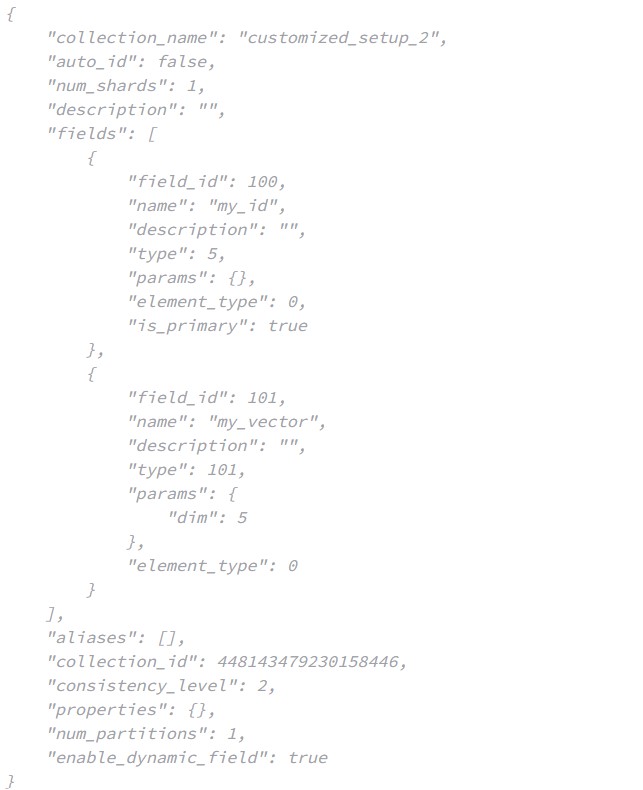
- To list all the existing collection.
# 6. List all collection names
res = client.list_collections()

print(res)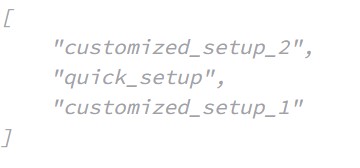
(6) Load & Release Collection
- During the loading process of a collection, Milvus loads the collection’s index file into memory.
- Conversely, when releasing a collection, Milvus unloads the index file from memory.
- Before conducting searches in a collection, ensure that the collection is loaded.
Load A Collection:
- To load a collection, use the
load_collection()method, specifying the collection name. - You can also set
replica_numberto determine how many in-memory replicas of data segments to create on query nodes when the collection is loaded.
- Milvus Standalone: The maximum allowed value for
replica_numberis 1. - Milvus Cluster: The maximum value should not exceed the
queryNode.replicasset in your Milvus configurations. For additional details, refer to Query Node-related Configurations.
# 7. Load the collection
client.load_collection(
    collection_name="customized_setup_2",
    replica_number=1 # Number of replicas to create on query nodes.
                     # Max value is 1 for Milvus Standalone,
                     # and no greater than `queryNode.replicas` for Milvus Cluster.
)

res = client.get_load_state(
    collection_name="customized_setup_2"
)

print(res)
Release A Collection:
- To release a collection, use the
release_collection()method, specifying the collection name.
# 8. Release the collection
client.release_collection(
    collection_name="customized_setup_2"
)

res = client.get_load_state(
    collection_name="customized_setup_2"
)

print(res)
(7) Create Aliases
- To create aliases, use the
create_alias()method, specifying the collection name and the alias.
# 9.1. Create aliases
client.create_alias(
    collection_name="customized_setup_2",
    alias="bob"
)

client.create_alias(
    collection_name="customized_setup_2",
    alias="alice"
)
List Aliases:
- To list aliases, use the
list_aliases()method, specifying the collection name.
# 9.2. List aliases
res = client.list_aliases(
    collection_name="customized_setup_2"
)

print(res)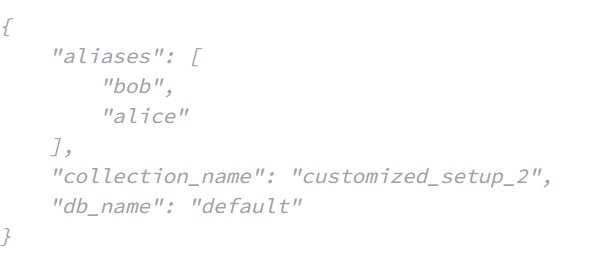
Describe Aliases:
- To describe aliases, use the
describe_alias()method, specifying the alias.
# 9.3. Describe aliases
res = client.describe_alias(
    alias="bob"
)

print(res)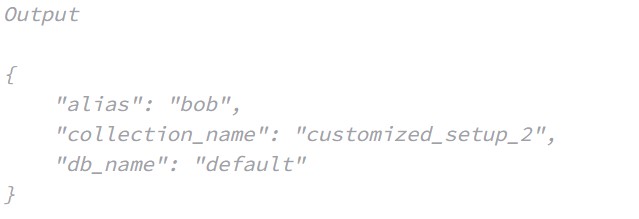
Reassign Aliases:
To reassign aliases to other collections, use the
alter_alias()method, specifying the collection name and the alias.
# 9.4 Reassign aliases to other collections
client.alter_alias(
    collection_name="customized_setup_1",
    alias="alice"
)

res = client.list_aliases(
    collection_name="customized_setup_1"
)

print(res)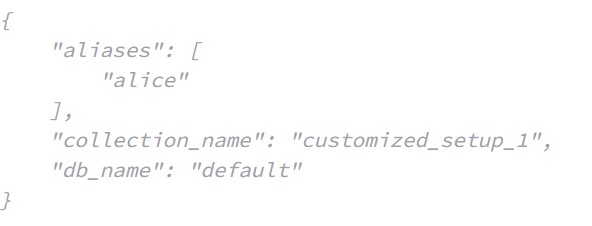
res = client.list_aliases(
    collection_name="customized_setup_2"
)

print(res)
Drop Aliases:
- To drop aliases, use the
drop_alias()method, specifying the alias.
# 9.5 Drop aliases
client.drop_alias(
    alias="bob"
)

client.drop_alias(
    alias="alice"
)
(8) Drop A Collection
If a collection is no longer needed, you can drop the collection.
To drop a collection, use the
drop_collection()method, specifying the collection name.
# 10. Drop the collections
client.drop_collection(
    collection_name="quick_setup"
)

client.drop_collection(
    collection_name="customized_setup_1"
)

client.drop_collection(
    collection_name="customized_setup_2"
)