Transformers – Encoder Architecture
Table Of Contents:
- What Is Encoder In Transformer?
- Internal Workings Of Encoder Module.
- How Encoder Module Works With An Example.
- Why We Use Addition Operation With The Original Input Again In Encoder Module?
(1) What Is Encoder In Transformer?
- In a Transformer model, the Encoder is responsible for processing input data (like a sentence) and transforming it into a meaningful contextual representation that can be used by the Decoder (in tasks like translation) or directly for classification.
- Encoding is necessary because, it,
- Transforms words into numerical format (embeddings).
- Allows self-attention to analyze relationships between words.
- Adds positional information to maintain word order.
- Enables the model to process different data types like text, images, or speech.
(2) Internal Workings Of Encoder Module.
- For simplicity the entire architecture of Encoder and Decoder model can be considered as two boxes inside a main box.
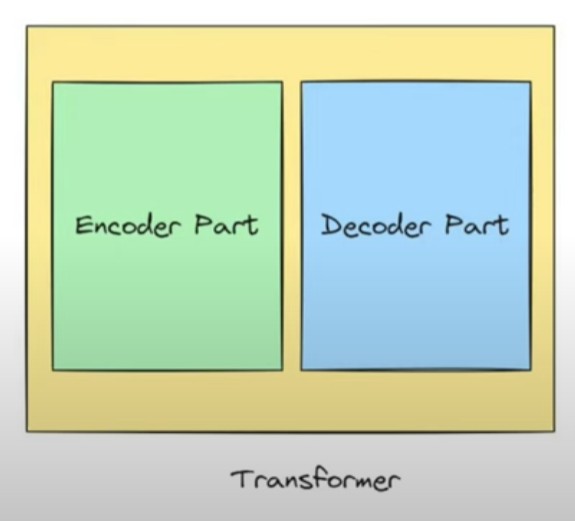
- You can see that there is Nx written beside the Encoder and Decoder module of Transformer.
- Nx = signifies multiple encoder and decoder module present in the Transformer architecture.
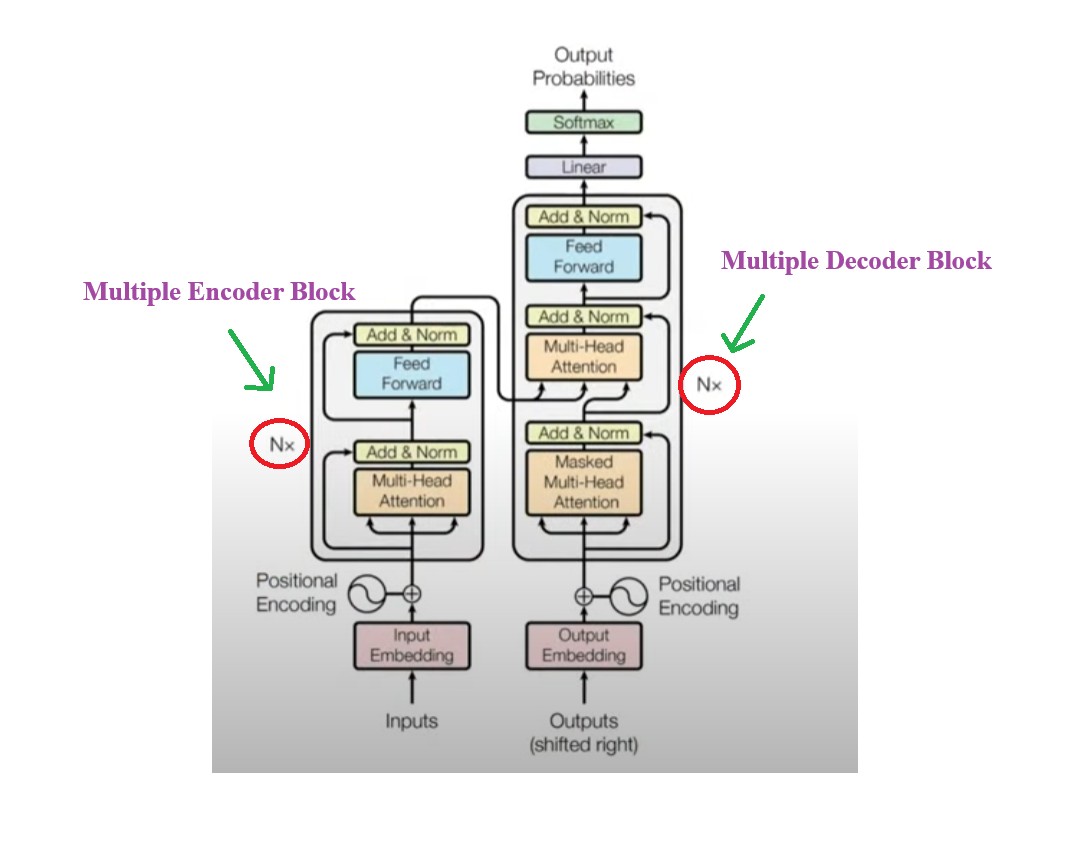
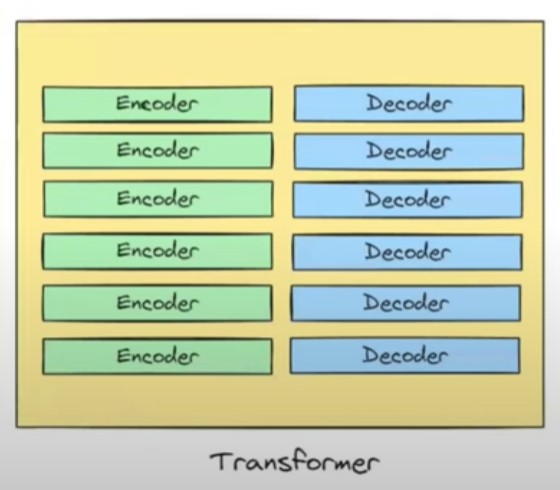
- In the original paper we have 6 encoder blocks and 6 decoder blocks.
- We will use a simple block diagram to represent the 6 encoder and 6 decoder.
- Now the question is whether all these 6 blocks are identical in nature ?
- Answer is Yes, all the components and architecture in all these 6 blocks are identical in nature.
- But the difference is the weights and biases values for each block will be different.
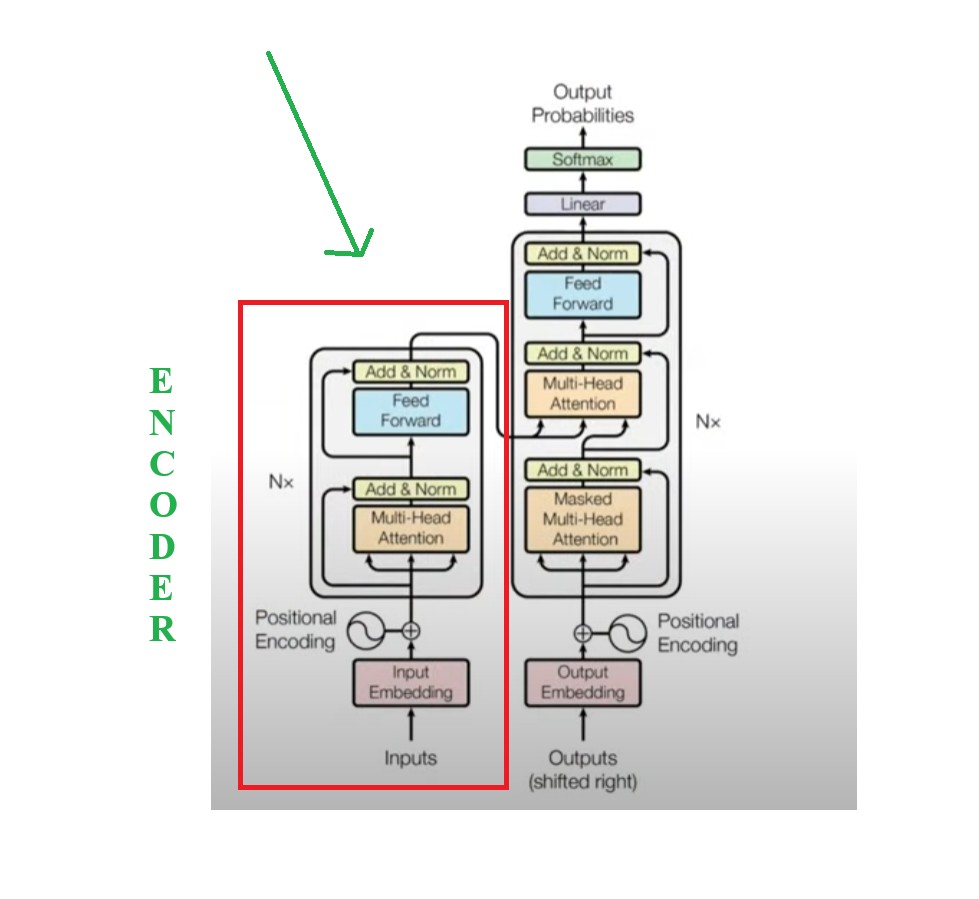
- Now let us understand the a single Encoder block architecture.
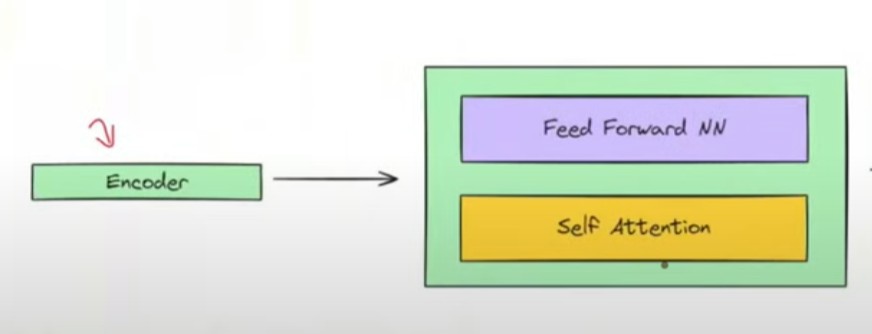
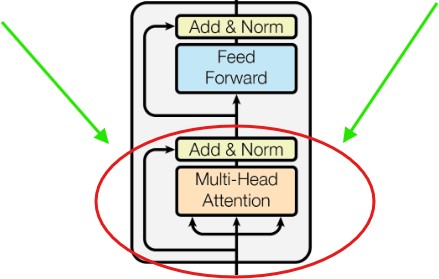
- Mainly there are two blocks inside the encoder block.
- Self Attention Block.
- Feed Forward Block.
- As you can see in the above image.
- In below image you can see the original architecture of an Encoder module.
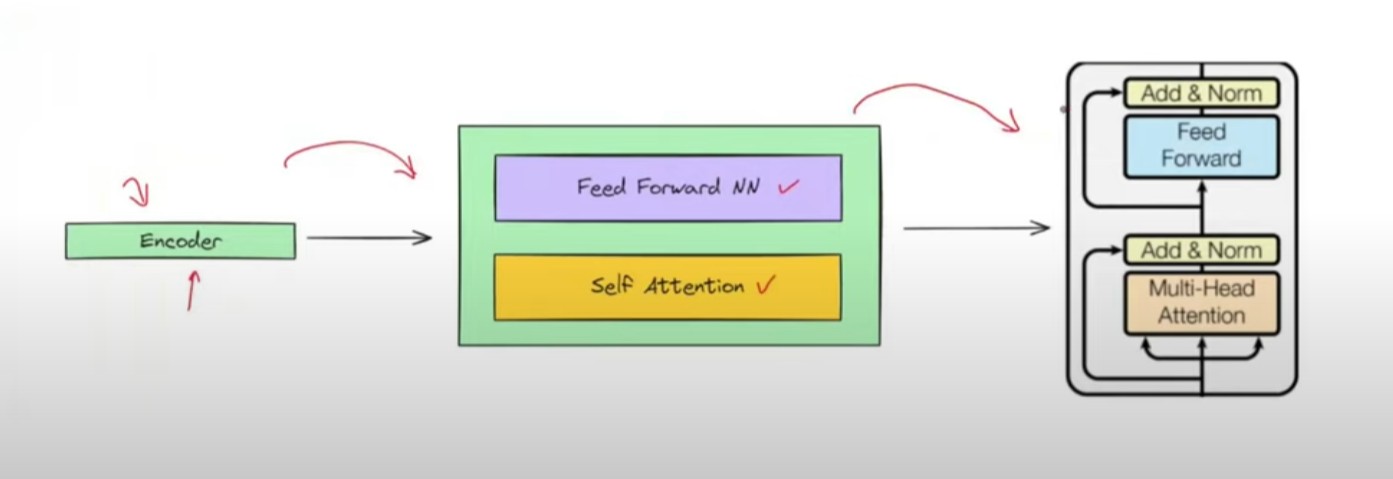
- Originally the Encoder module will looks like this below image.

(3) How Encoder Module Works With An Example.
(3.1) Understanding Input To The Encoder
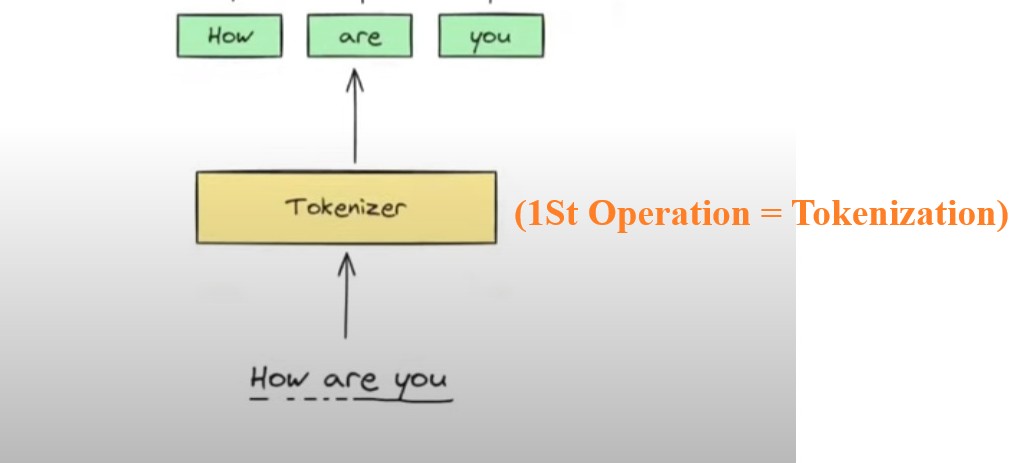
- Suppose our example sentence is : “How Are You?”.
- In practice you sent multiple sentences at a time. For simplicity we will send one sentence at a time.
- At the input stage we perform 3 different operations let us understand this with a diagram
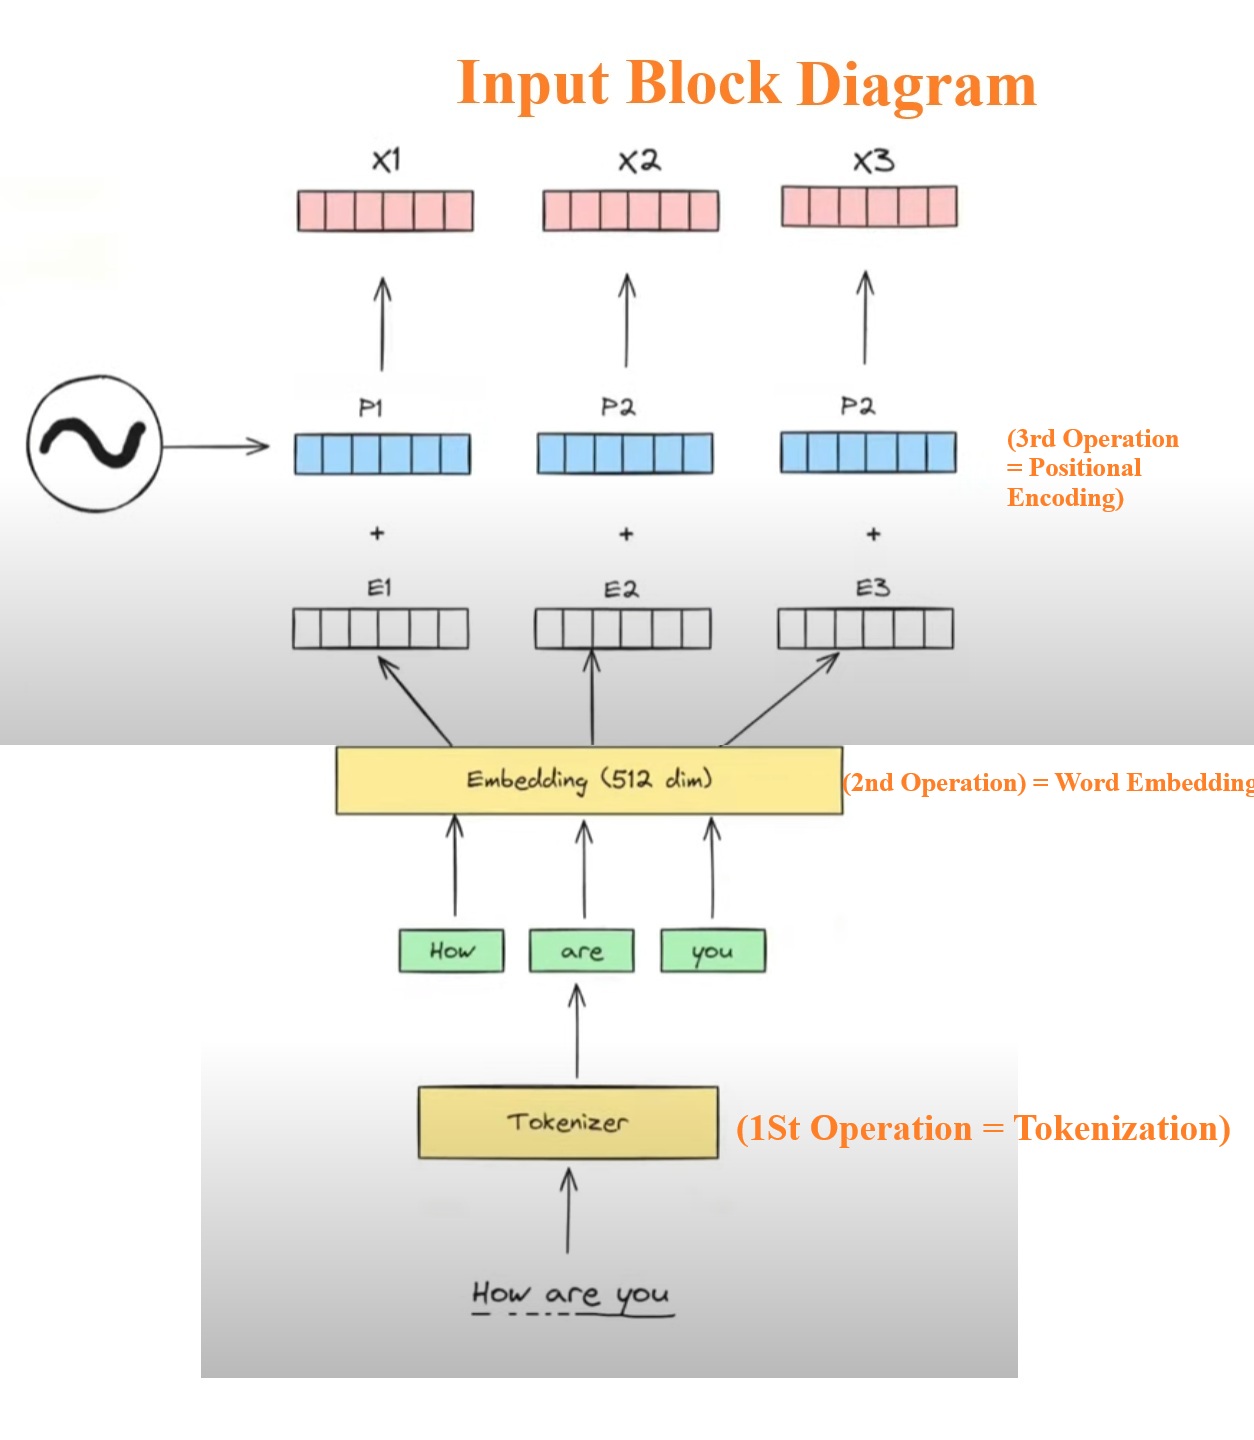
Operation-1: Tokenization
- The first operation that we are going to perform is Tokenization.
- Here we will convert the entire sentences into smaller tokens.
- We will tokenize based on words.
- “How Are You” = ‘How’, ‘Are’, ‘You’.
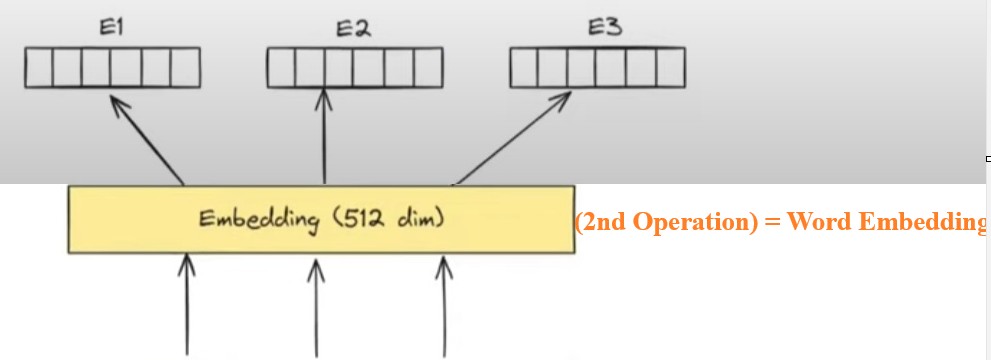
Operation-2: Word Embedding
- The 2nd operation which we are going to perform is to convert individual words into its embedding format.
- We can use word2vec or any other word embedding technique.
- In our example we will convert individual words into 512 dimension vectors.
- For each word it will generate one embedding vector in our case it is E1, E2 and E3.
Operation-3: Generate Positional Encoding
- The Self Attention model will not have information about the order of the words in the sentence.
- Hence we will use Positional Encoding vectors to add positional information in the embedding.
- From Positional Encoding we will generate 3 positional vectors (P1, P2, P3), these positional vectors we will add it to the embedding vectors to encode the positional information in the contextual embedding values.
- We will add the Positional Encoding vectors to the Embedding vector to capture the position of the words in the sentence.
- And finally we will have the output of (X1, X2, X3).
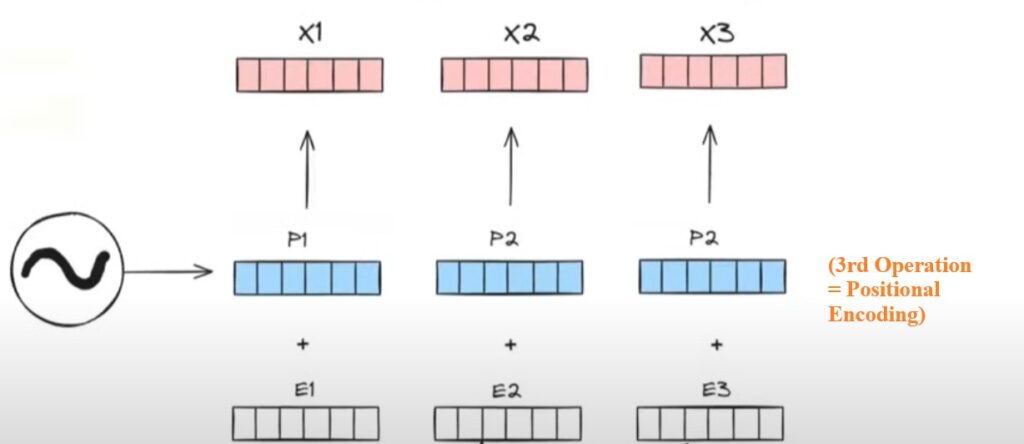
- Here (X1, X2, X3) will be my final input which will go to the Encoder block.
(3.2) Understanding Multi-Head Attention and Add & Norm.
- We will understand 1st part of the encoder module which is “Multi-Head Attention” and “Add & Norm” module.
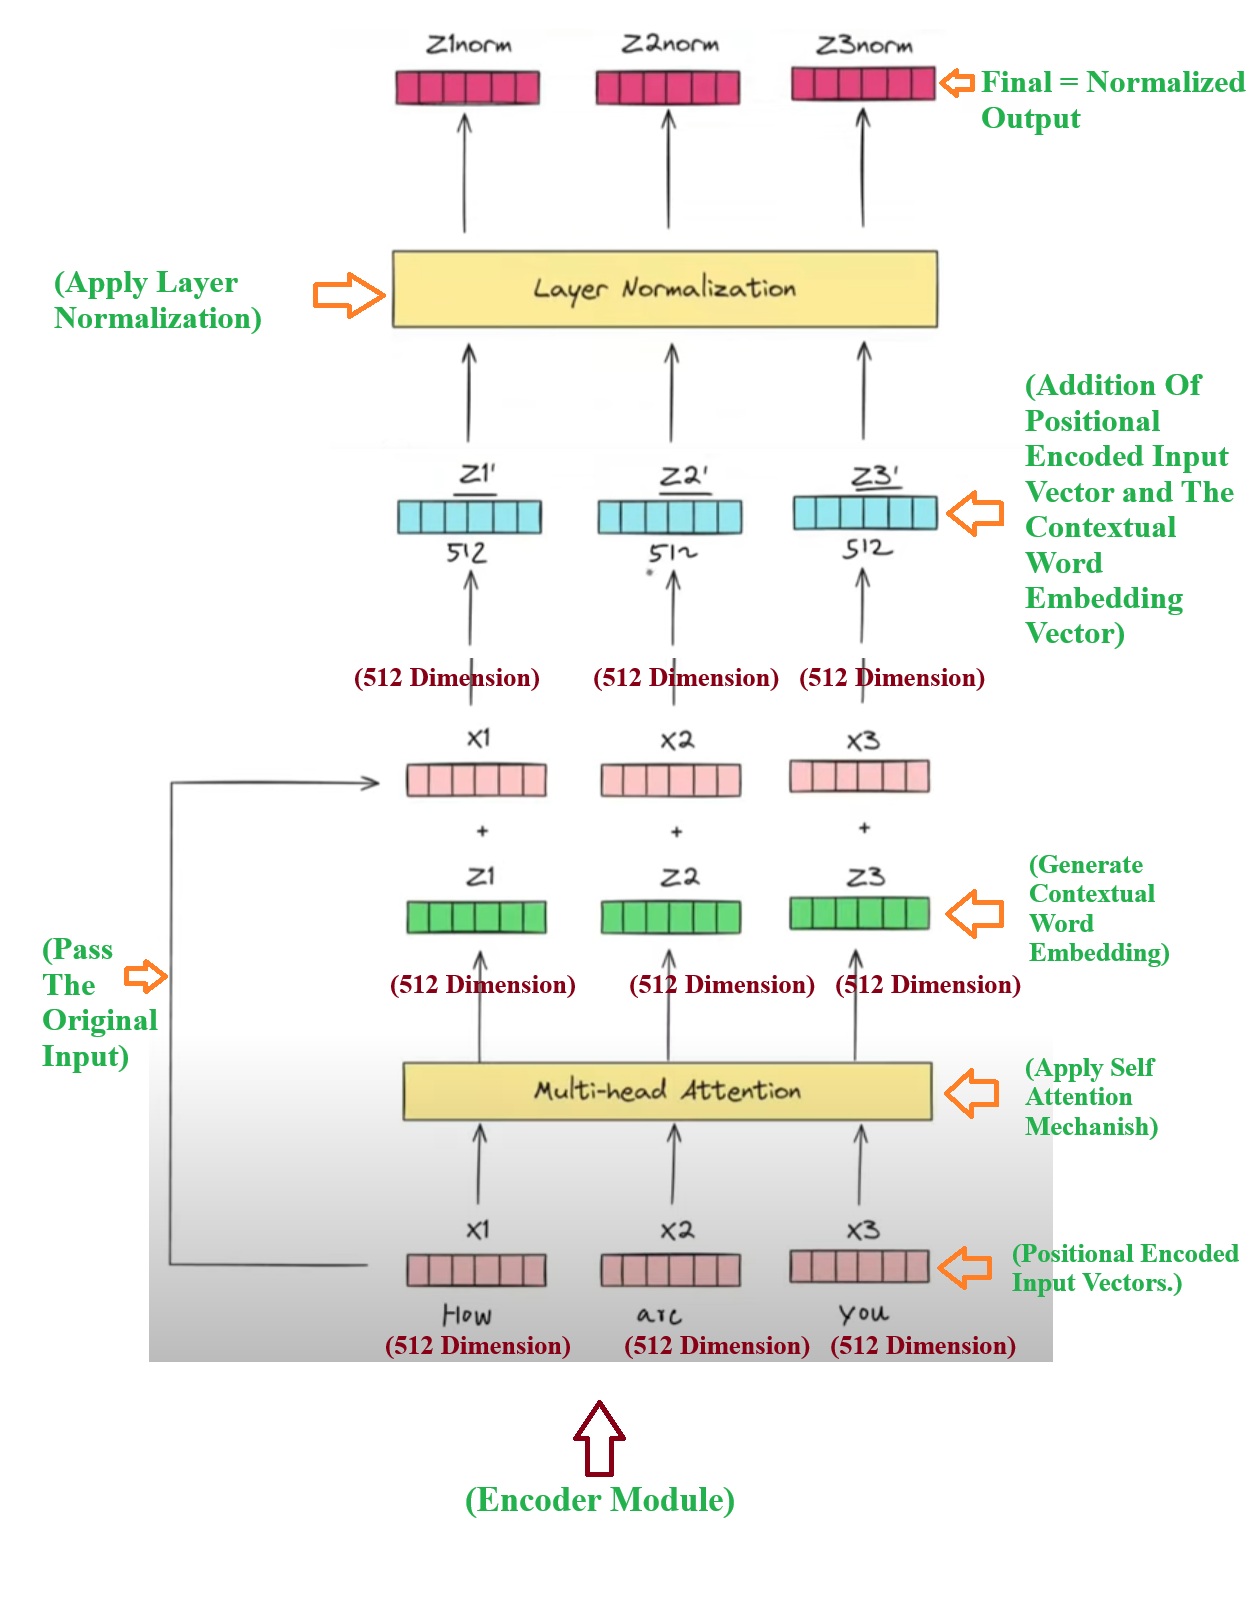
- Step-1: First step is to prepare the Positional Encoded Input vectors which we have already got from Input module. This positional encoded vectors will not have the contextual awareness. Hence we need to pass it to the “Multiheaded Self Attention” mechanism to get the contextual embedding vectors for each word.
- Step-2: Pass the positional encoded vectors to the Multi-head Attention module. This will generate the contextual embedding for individual words. Which are (Z1, Z2, Z3).
- Step-3: We will pass the original input as it is to the add & Norm module.
- Step-4: Now we will add the original input values with the contextual word embedding values. (x1 + z1, x2 + z2, x3 + z3). We will get as an output as (Z1`
, Z2`, Z3`). - Step-5: Now we will apply the Layered normalization to the output of the Multi Headed Attention module. It will calculate the mean and standard deviation of each numbers in the 512 dimension and normalize them.
- Step-6: We will get the normalized output from normalization which will be, (Z1norm, Z2norm, Z3norm)
(3.3) Understanding Feed Forward and Add & Norm.
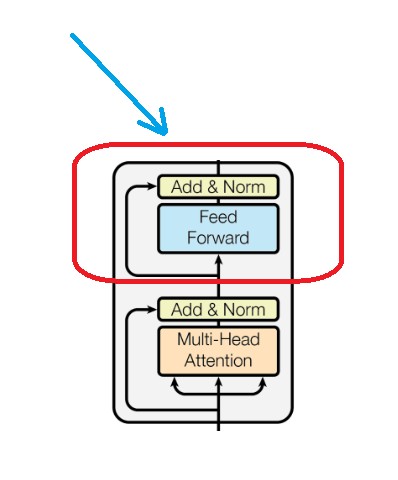
- Now we will understand the 2nd part of the Encoder module which is ” Feed Forward and Add & Norm “ module.
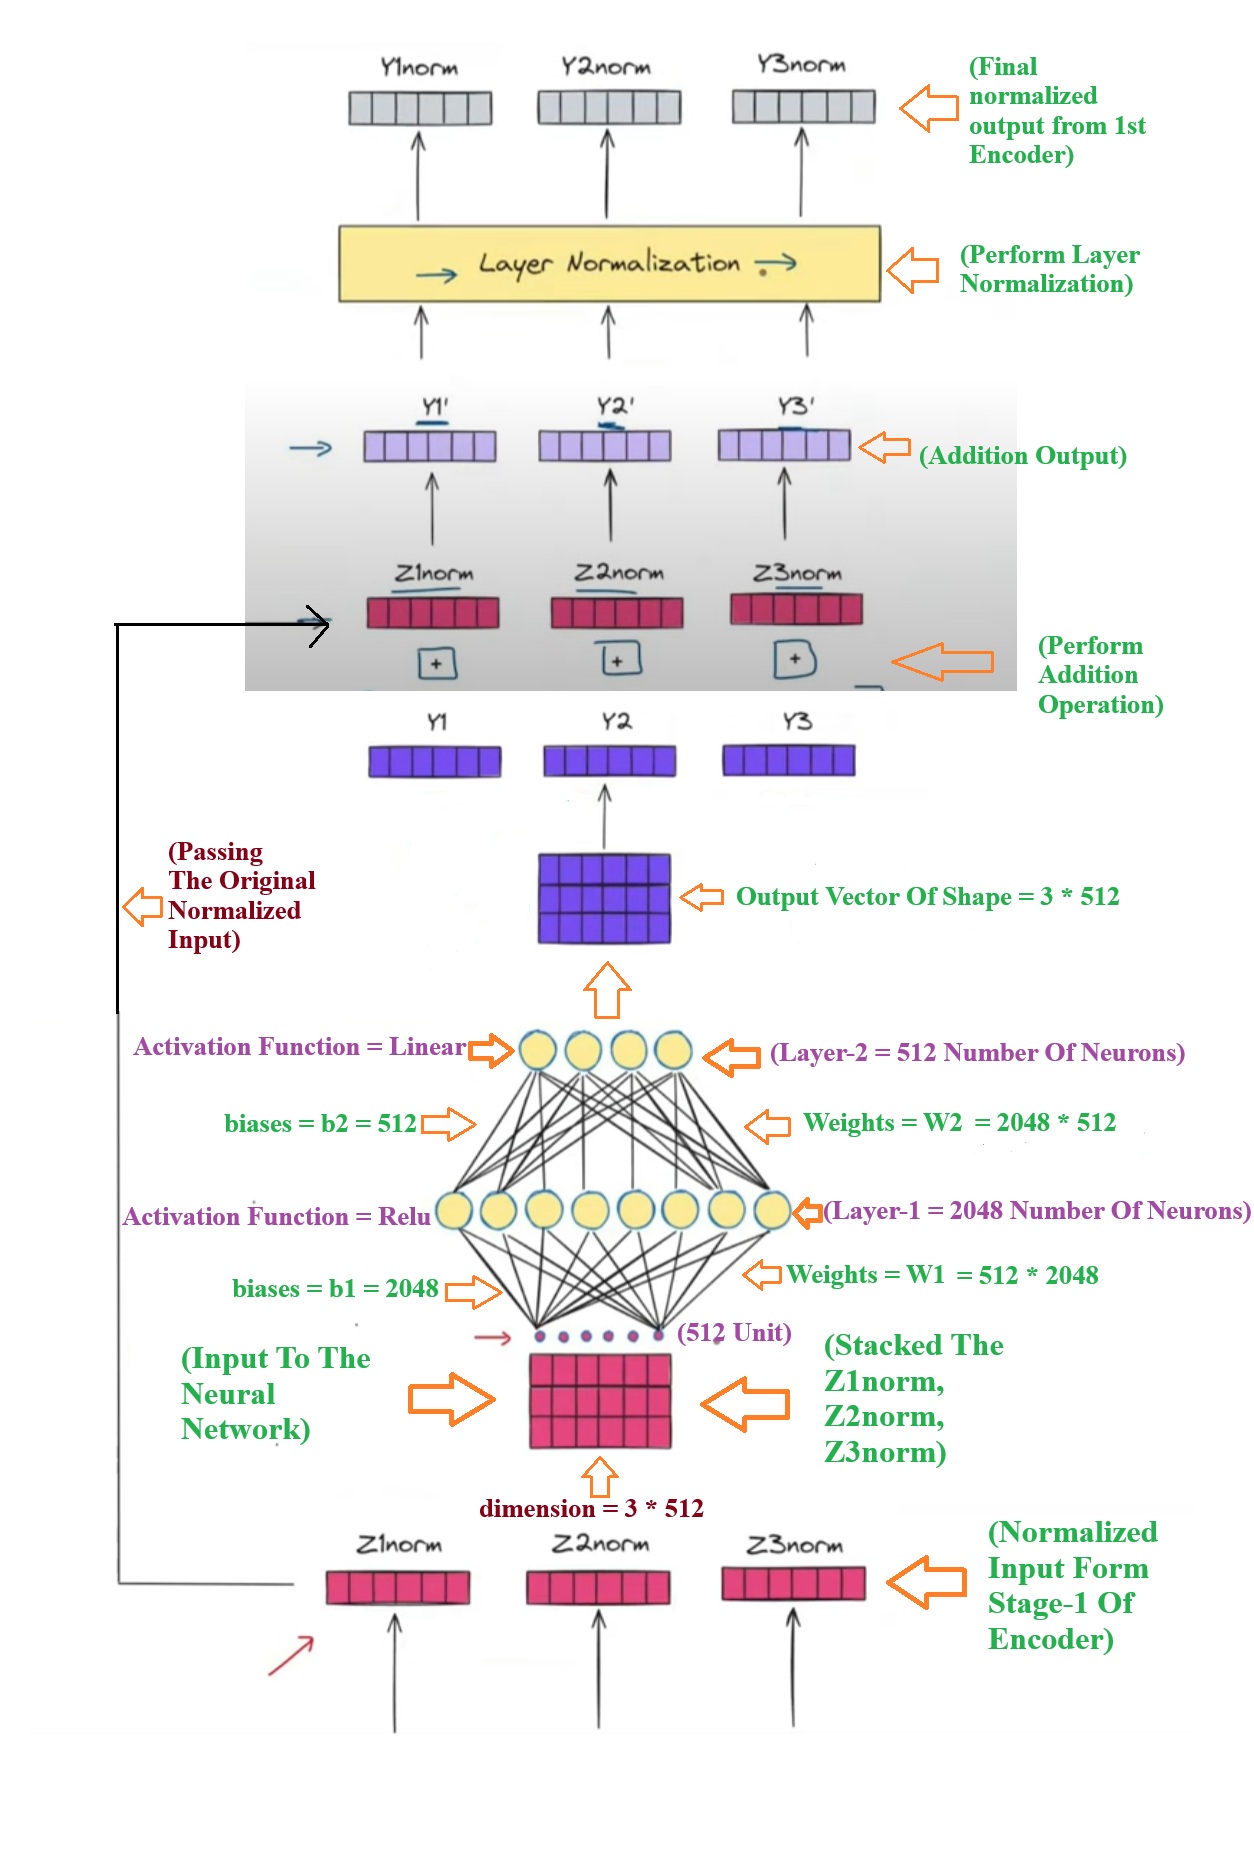
- Step-1: From the stage-1 of the encoder module we will receive the normalized values of the each word. For the sentence “How Are You” we have received the Normalized Contextual embedding vectors as (Z1norm, Z2norm, Z3norm).
- Step-2: We will stack these 3 individual normalized vector and form a matrix of 3 * 512.
- Step-3: You will send this batch of 3 * 512 vector matrix to the neural networks.
- Step-4: These 3 * 512 vector matrix will get multiplied with the weight of 512 * 2048 matrix and the 1st layer of the neural network will produce (3 * 512) . (512 * 2048) = 3 * 2048 dimension output.
- Step-5: We will add this 3 * 2048 vector with 2048 bias values and we will apply the activation function ‘relu’ on it. Layer-1 output will be, relu(ZnormW1 + b1).
- Step-6: We will pass this relu(ZnormW1 + b1) matrix to the second layer and the operation happen will be [relu(ZnormW1 + b1)]W2 +b2. The output dimension from the 2nd matrix will be (3 * 2048) . (2048 * 512) = 3 *512.
- Note: In first layer you have increased the dimension of the vector 3 * 512 to 3 * 2048 and in the second layer you again reduced the dimension from 3 * 2048 to 3 * 512. Why we increased the dimension and again decreased the dimension what benefit did we get ??
- The benefit of doing this is we have increased non linearity in the data by the help of ‘relu’ activation function.
- Step-7: Now we will perform the add and Normalize operation to the output of the feed forward neural network.. And it will produce the final output (Y1norm, Y2norm, Y3norm) values.
- Step-8: This (Y1norm, Y2norm, Y3norm) values will go to the next encoder block.
- Note: The weights and biases of every encoder module will be different this will ensures that we will capture the complexity present in the Natural Language.
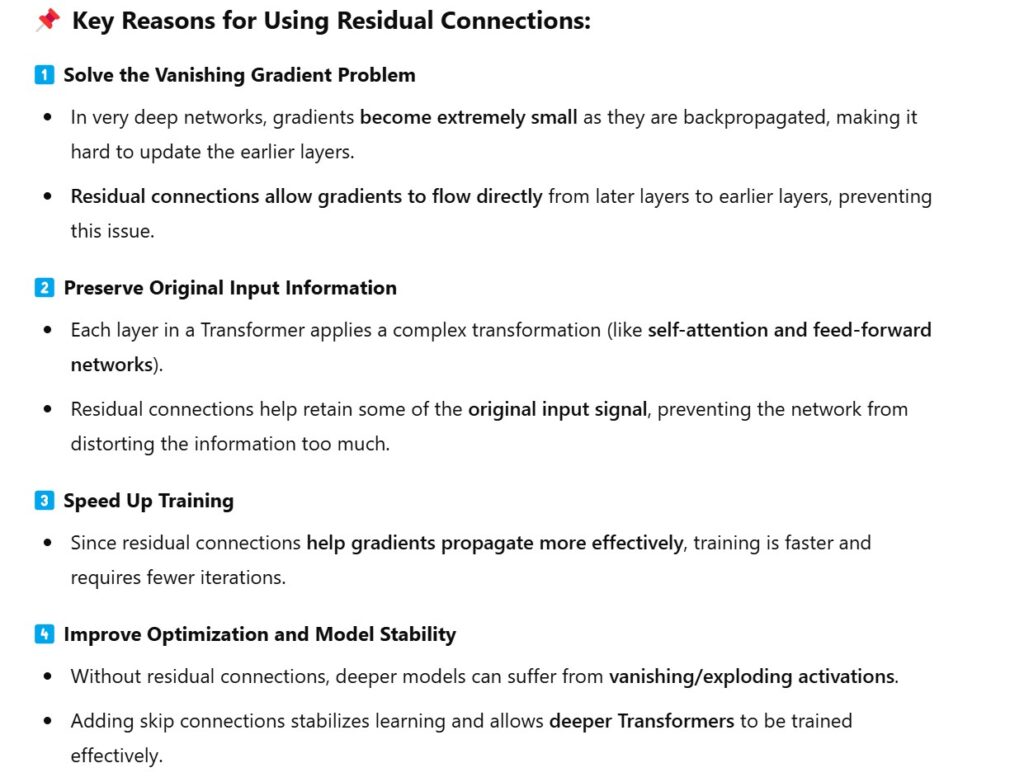
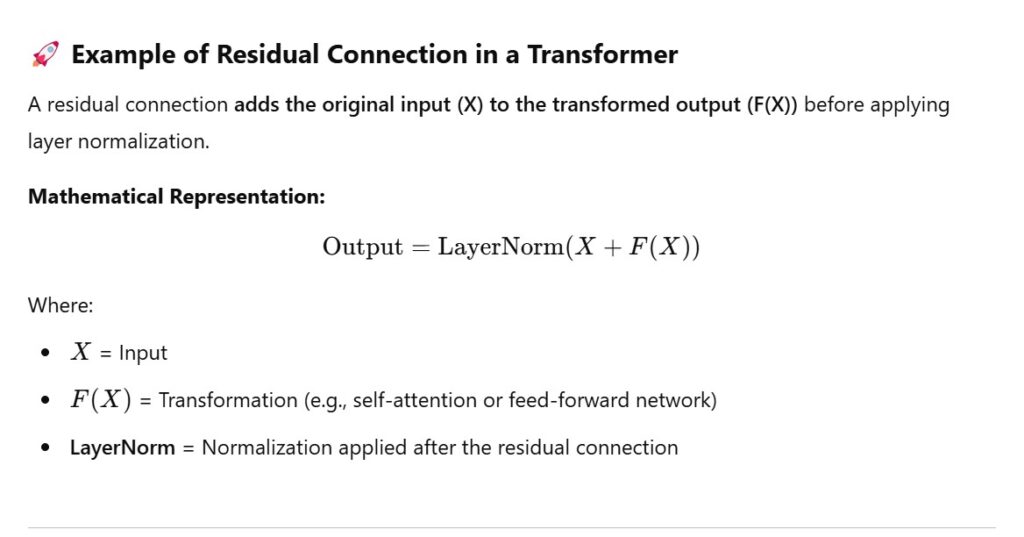
(4) Why We Use Addition Operation With The Original Input Again In Encoder Module?